Wednesday, December 5, 2012

PTI Make It Monday #94

Good evening fellow crafters! It's been a while since I last posted or participated in any Papertrey Ink challenges! I hope you are all doing well, enjoying the time you have left until yet another year is gone! Like I mentioned in my previous post, we are still getting ready for our Christmas vacation to California to visit Disneyland, only 11 more days! We are beyond excited, and by we, I mean my DH and I, we are way more excited than the kids!

I've been busy trying to make Holiday card sets to sell in my Etsy shop, and I've been working as many hours as they will let me, just so we can have some extra spending money for this trip! I finished this card set today and decided to use it for my entry into this week's Make it Monday Challenge over on Nichole Heady's blog. The challenge this week is Detail Glitter Technique.


I created a set of 12 cards, each measuring 5" by 3¾". I used Kraft cardstock for the card base. I used the snowflakes from Papertrey Ink's Shape Up Snowman Accessories stamp set and stamped a colorful Snowflake background. I used Stampin' Up Ink in Real Red, Certainly Celery, Pretty in Pink, and Bashful Blue to create a repeated Snowflake background onto each card. I used the Snowman and Penguin stamp from Papertrey Ink's Tremendous Treats Christmas stamp set, and colored them in with some Prismacolor Markers. I added a red border along with some glitter to accent the top and bottom of my image and sentiment. The Merry Christmas is from a Hero Arts occasion stamp set.

I really love this time of year, everyone is making some really creative Holiday projects! I love seeing all the fun Holiday cards! Thanks for stopping by, have a great week!

Tuesday, November 13, 2012

PTI Make it Monday #91

Good evening fellow crafters! Man, oh, man it has been over a month since my last post! How are you all doing? We are only a little over a month away from over Christmas Vacation to Disneyland, so we've been busy putting together all the last minute details needed, making sure our hotel and car rental are still booked, and of course working, working, working to earn some extra spending cash! I am so excited! Probably more excited than the kids! We asked them earlier this year if they would rather spend Christmas at home and get presents, or save all that money and go to Disneyland for 2 weeks instead. I was ecstatic when they chose Disneyland! I can't wait to see it for Christmas. Have any of you been there for the Holidays? I've heard that it is spectacular! So I've decided to follow the 5 Gift Rule for Gift-giving to Our Children this year:


This way, I don't have to worry about getting them too much, because I know we are going to come home with way more stuff than what we actually take. I was thinking about mailing a package with the gifts to the hotel 2 weeks before we arrive. Anybody ever travel during the holidays and have to do this? Let me know your opinion and if you think it's a good idea. I am just trying to think ahead and not have to carry so much stuff with us in the car ride there to California!

Anywho, on to this week's challenge. I've been itching to participate in the different challenges posted over the last month, but just haven't had the time. We went out to dinner tonight, and as soon as we came home, the kids and the hubby were in bed by 8:00pm. Can you believe it?! So glad I got a little bit of time to myself tonight. Didn't have to worry about making dinner and washing dishes! Yay me! This week the Challenge is presented by the wonderful Dawn McVey, and the challenge is to create a project with a faux pocket. There are so many great projects so far! I love seeing all the great Christmas cards and crafts!


I decided to make a Gift card holder with a faux pocket on the front to hold a standard size gift card. This way, the sender still has room to write a personal message inside the card to their recipient. I stopped by Hobby Lobby last week and picked up the Santa & friends 48 sheet 6x6 paper pad. The pattern paper included is just adorable! They were 50% off so I picked up 4 packs! So I used some Kraft cardstock, along with the patterned paper for my card. I added some white grosgrain ribbon and some red/white Christmas twine from Martha Stewart. I found the Santa and Snowman image through Google last year, and used it for lots of Christmas Projects. It turned out to be the perfect size to add to the front of the card. I colored in the image with my Prismacolor markers and added a touch of glitter. The sentiment on the inside of the card is from Papertrey Ink's Think Big Favorites #20. The Merry Christmas stamp on the front of the card is from Hero Arts.

Sorry for the long post, thanks for visiting, and I hope you all enjoy the rest of your week!

Thursday, September 27, 2012

PTI Make It Monday #84

Good evening fellow crafters! Are you excited that tomorrow is Friday?! Of course you are! I plan on spending all weekend decorating for Halloween, I cannot wait to get started! I've been anxiously pulling out all the decorations over the last few weeks. I wanted to put everything up weeks ago, but that might have been a little too early!

Tonight I wanted to share with you my card for this weeks Make it Monday challenge for Papertrey Ink over at Nichole's blog. This week the challenge is Reflective Sentiments. You have to watch the tutorial from Betsy Veldman to see how she does it.


I used the new Santa Stationary stamp set (I've mentioned before that I think this stamp set is just genius, it's too freakin' adorable!). I also used the Think Big Favorites #20 stamp set for my "reflective" sentiment. I inked up Santa in Stampin' Up's Close to Cocoa ink, and the sentiment was stamped with Handsome Hunter. I used my Stamp-a-ma-jig clear stamping sheet to do my reflective stamping in the same color. I added some color to Santa with my Prismacolor markers and a little glitter to his hat.


This card was super simple and fast to put together, this is a great layout for a fast, easy Christmas card set that you can easily mass produce. Have a great night, thanks for stopping by!

Wednesday, September 26, 2012

Halloween Pillow Boxes

Good morning fellow crafters! Happy Wednesday! This is "my" day of the week where I have the entire morning to myself before heading off to a late work day. I use Wednesday to catch up on projects or new orders for my Etsy Shop, and I can do it completely without interruption! Isn't that just the best? (Not that I don't love having the family around, but hey, we all need a little "me" time!)

I have wanted to purchase a Pillow Box die for some time now, but I wasn't sure exactly who to purchase it from, so when Papertrey Ink announced this month that they were releasing one, I was ecstatic! I received it in the mail on Monday and I decided to make a set of 10 for Halloween.


I used Kraft, Basic Black, Old Olive, Pumpkin Pie, and Elegant eggplant cardstock for these boxes. I used Halloween patterned paper from the Target dollar spot from last year. I used the Limitless Layers Oval die collection with Kraft and cream cardstock. I stamped the "Happy Halloween" in basic black ink. The sentiment is from Hero Arts #CL498. There is no name on the stamp set, but it has a ton of Holiday sentiments!

I love that these little pillow boxes are the perfect size to hold a gift card, I cannot wait to make a ton of these for Christmas! Thanks for stopping by!

Tuesday, September 25, 2012

Papertrey Ink September Blog Hop

Good evening fellow crafters! I hope you are all enjoying your week so far! Just a quick post tonight to share what I have put together for Papertrey Ink's September Blog hop! This month's challenge is all about "wrapping it up". Nichole has challenged us to incorporate fabric and felt into our projects.

My September order from PTI yesterday after an excruciatingly long 9 day wait! I was so excited to finally get my order, I have wanted a Pillow box die for the longest time! I love having one now, it's perfect for any occasion and I just love that you can fit a gift card inside! I do not have any felt, so I opted to use some metallic fabric ribbon instead to put together a set of 2 pillow gift boxes.

I used Kraft cardstock to cut out the 2 pillow boxes. I wrapped the 2 boxes with the metallic fabric ribbon using sticky strip. I used the Limitless Layers Oval die collection with some maroon and cream cardstock. I used the Christmas tree stamp from Inkadinkado's Artistic Holiday stamp set and embossed that image onto the cream cardstock with Gold embossing powder. I didn't want the Christmas tree image, just the pattern of the tree itself, and I was able to fit it perfectly onto the cardstock. I used the "Sending Holiday joy" sentiment from Framed Out #8 and stamped that in gold ink from Inkadinkado's Rainbow Treasure pigment ink pad.


I cannot wait to make more of these little boxes to give out for Halloween and Christmas! I also was very excited to receive the Santa Stationary stamp set. Whoever came up with this stamp set is a genius! I love it! I just have to keep it away from the kids though, they aren't allowed to see it! I made a small "Letter from Santa" card.


I got my ideas for placement of the stamps on this card and envelope from both Nichole Heady and Maile Belles.

The holidays are fast approaching, I really hope I get to make lots more goodies with all my Halloween and Christmas stamp sets! Thanks for stopping by, good night!

Wednesday, September 19, 2012

PTI Make it Monday #83

Good morning fellow crafters! Happy Wednesday! I hope you all are doing well! Today I am sharing with you the card I put together for this weeks Make it Monday Challenge over on Nichole Heady's blog.

This "Card Aisle Inspiration" is hosted this week by Melissa Phillips. She challenges us to find a greeting card from the store (gasp!) and take inspiration from it and create our own. I had to hide my face when I purchased a real, store-bought, mass-produced Hallmark card. Yikes. There are lots of great cards out there though, you can definitely find tons of inspiration walking down those card aisles!

I chose this beautiful "Welcome Baby Girl" card from Hallmark. I loved the idea of the vellum cardstock covering the actual card, so I decided to use this as my inspiration.


I am not used to the large size cards they usually sell, so I had to scale it down to a standard A2 size card. I cut the vellum to be 5½ x 4¼", and the white card inside the velum is 4" x 5". I used an Elmer's flexible dual tip glue pen (for paper and fabric) to attach the white card base to the vellum instead of sticky strip or tape runner. I did not want the adhesive to be visible on the vellum itself. I used a rub-on Friendship quote from DCWV Friendship rub-on quote pack for the sentiment on the front of the card. For the white card base, I used the Papertrey Ink's Beautiful Butterflies stamp set and Stampin' Up inkpads in Brocade Blue, Certainly Celery, and Close to Cocoa.


I love the way this card came out and I cannot wait to give it to one of my friends! I love the idea of the "hidden" butterflies behind the vellum. Thanks for the inspiration Hallmark!

Sunday, September 16, 2012

Halloween Lollipop Holders

Good evening fellow crafters! I hope that you all have had a fantastic weekend! My dad came into town last night from San Antonio, so he was here tonight with his girlfriend. The girls and their cousins got to spend a few hours with them, they already head back home tomorrow :( We don't see my dad very often, so I was surprised at how upset my youngest one was when he left, she was crying. We have not yet had the chance to visit him in San Antonio, but I hope we get that chance soon!

Today I am sharing with you another Halloween favor set I put together. When I saw this stamp and Die-namics set from My Favorite Things, I just knew I had to have it. Whoever came up with this idea is brilliant, it is so perfect for putting together lollipop holders! I love it because I didn't have to use ANY ADHESIVE! Not one bit! It was awesome! They came together very quickly. I used a full-size Charms Blow Pop inside each one.


I used regular white cardstock for the bases. I also used Basic Black, Pumpkin Pie, Elegant Eggplant, and Old Olive cardstock and inkpads from Stampin' Up. I used black crochet thread from Red Heart to tie them together. I stamped the back of each one with sayings from the same stamp set.

This was my very first My Favorite Things purchase, and I seriously love it. Cannot wait to use it for Christmas on candy canes! I'm also thinking for the kids at school too, maybe some pencils or even with the Skittles candy sticks?! Ahhh so many ideas running through my mind! I definitely recommend you buy the set together, it only cost $39.95. If you purchase them separately, it would cost $49.90.

Thanks for stopping by, have a great week!

Sunday, September 9, 2012

PTI Make it Monday #81

Good evening fellow crafters! Hope you all have had a wonderful, fantastic weekend! I worked yesterday (Saturday) and was so exhausted when I got home, I ended up going to bed at 8:30pm. I woke up at 6:00am, had some coffee, browsed the blogs, then spent a few hours tidying up my craft room. I was surprised that not too many people entered this weeks Make It Monday Challenge over at Nichole's blog.

I have to admit that I wasn't really interested in participating this week. I have tried to work with polymer clay before. Remember that show Crafters Coast to Coast? I loved watching that show every week. I went out and bought tons of Sculpey and Fimo clay 5 or 6 years ago after seeing someone make polymer clay beads on that show. I figured, hey if they could do it so could I. Well, to my surprise, it was a lot harder than I thought to make the damn little beads, so needless to say, I gave up. And the clay has been sitting unused since then. This is what my polymer clay/candle making supply drawer looks like today:


I thought for sure this stuff would be hard as a rock by now. But it is all actually STILL GOOD! Can you believe it? Years and years have passed and this crap is still moldable! So now I was pretty excited that I could once again participate in another Make it Monday Challenge. Woohoo! So I took out all my supplies, including the polymer clay in Halloween colors: orange, purple, and green. I rolled them out to a size 3 on my pasta machine (yep, I even wasted money on this thing, and today was probably the 3rd time I've ever used it!). I wanted the clay to be thin enough that they would not weigh down my card, and also to all be the same size. I used the Happy Haunting Ghost die to cut out my little ghosts and then baked them according to the package.


I don't have Black Stazon inkpads, so I stamped using Black dye ink and then went over that ink with a sharpie so the faces would not smear. I adhered the little guys to my card using red sticky strip. I am no too sure where the patterned paper is from, it was left over scrap from Halloween last year. The Happy Halloween was stamped from Inkadinkado's Cats and Bats stamp set. I fell in love with this card by valerie, she created it for the Mr. Bones Halloween Spook Out, so here is my version of her card:


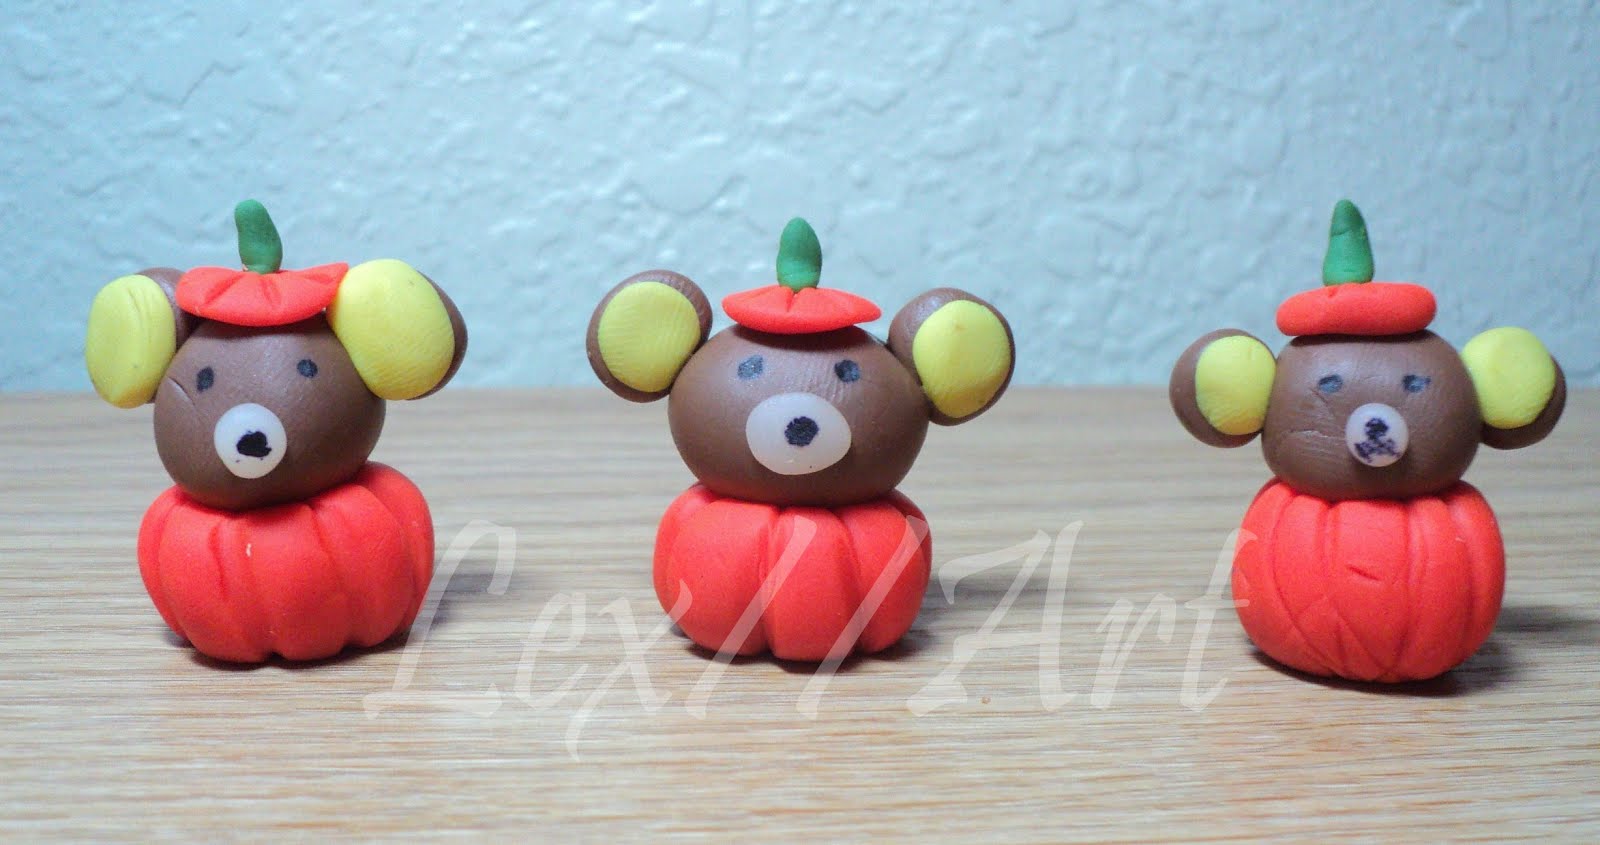
My little girls were so excited that I was playing with "play dough" that they wanted to desperately help make something. We came across this video on Youtube and made these little pumpkin cuties:


They are already talking about making more things tomorrow after school. I have to admit, I am excited this time to try a few more things out with the polymer clay. I guess I just need some practice! Sorry for the long entry, thanks for stopping by, have a great week!

Wednesday, September 5, 2012

Halloween Candy Wrapper Boxes


Okay, this is going to be my last Mr. Bones Halloween Spook Out entry!


I made these little candy boxes with Stampin' Up's candy wrapper die, Papertrey Ink's Happy Haunting Stamp set and matching die, and some Halloween Paper from last year that I found at the Target Dollar Spot. I always make these cute little treat boxes for the kids classes during the holidays. They don't hold a ton of candy, but they are super cute and super easy to put together!

If you have seen every one of my Halloween projects for this challenge over at Nichole's blog, thanks for stopping by each blog entry and seeing what I've created, I always love to see the great comments! Have a great night everyone!

Halloween Wreath


Here is another Halloween project for the Mr. Bones Halloween Spook Out! This is probably my favorite Halloween project that I've made so far! I made a bunch of these last year for Christmas and Halloween. I love the paper rosettes for wreaths, they are so unique and different! There is one wreath here and here that I made last year.


I buy my wicker wreath bases at the Dollar Tree whenever they have them in stock (which isn't often, snag 'em when you see them, they don't last long!). I used the 13" wreath base. I made the paper rosettes by hand (no Cricut or Rosette die.) I used patterned paper I had left over from last Halloween that I found in the Target Dollar spot. I used every image and saying from the Mr. Bones stamp set for this wreath. I also used the medium spider web from the Spider Web Trio die set. I added googly eyes to the little spiders, then adhered everything with my glue gun. I try to make the rosettes ahead of time and have extra on hand because that usually takes the longest.

Sorry for all the Halloween posts, I really do love making things for Halloween and Christmas more than anything, so there will be tons more projects coming your way! Thanks for stopping by!